


Published June 01, 2023
by Stephen Brayton
• Updated June 07, 2026
Achieving Inventory Precision: A Guide to Thorough Stock Takes
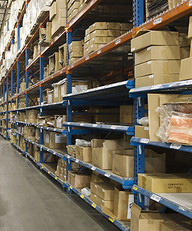 In any well-structured environment, from a home workshop to an expansive industrial facility, organization forms a critical foundation. Drawers, shelves, and cabinets hold various components, each systematically arranged. Despite this meticulous order, a crucial task often goes overlooked, jeopardizing the operational continuity of the setup. Neglecting this periodic procedure invites future complications, especially concerning the accurate availability of necessary parts or the complete absence of required stock. Let's look at achieving inventory precision through stock takes.
The Necessity of Regular Inventory Counts
The solution to maintaining precise stock levels lies in periodic physical inventory counts. While this process consumes time, the investment proves worthwhile. For a home workshop, the duration might not extend excessively, but for larger workplaces with extensive inventory, the time commitment significantly increases. Nevertheless, the importance of this task remains undiminished. Businesses must allocate personnel, or individuals must assume personal responsibility for counting parts, supplies, and tools. Avoiding situations where an emergency repair stalls due to an unavailable part in stock is paramount. While inventory management systems track quantities, human error remains a factor. An item might be taken or replaced without proper reporting, an incorrect quantity could be input, or various other discrepancies might arise.
A structured approach, aided by an inventory module in a computerized maintenance management system (CMMS), facilitates this essential physical count. This system guides users through four straightforward steps, transforming a potentially daunting task into a manageable procedure. Let's look at the MAPCON strategy for physical counts.
Step 1: Managing the Inventory Cycle
Establishing inventory cycles offers significant advantages, as they become readily accessible for current and future counting requirements. When creating a cycle, considerations include what items to count, where they reside, and the desired quantity for each. Factors such as company size, the total number of items, and available time influence cycle creation.
A cycle data field requires input; the name or code entered indicates the count type. This could be a condensed description, clarified further by the stockroom field. For example, a cycle might be designated "C-A" with the stockroom as "Central", or "M-All" with the stockroom as "Mezzanine."
In the first instance, "C" represents "Central" and "A" denotes a specific inventory classification for counting. The second example uses "M" for "Mezzanine," with "All" indicating a comprehensive count of every item within that area. The cycle number might incorporate a shelf designation, like "A" for a specific shelf within the "Central" stockroom.
Filtering Options for Precise Counts
The filtering options area holds critical importance for conducting counts. A key field within this section controls the maximum number of items per cycle count sheet section. Setting a reasonable maximum, for instance, fifty items, prevents overwhelming individuals with excessive items on a single sheet. The system then generates multiple sections for the designated area, as many as needed to encompass all parts. If five hundred parts exist, the system creates ten sections, each containing fifty items. This division allows different personnel to count distinct sections concurrently.
Price filters enable counting items within specific value ranges, allowing selection for "All", "Value Greater Than", or "Less Than", with the specific value entered in the filter price field.
Three checkboxes offer more specific item selection:
- Include items not assigned to a location: Exercise caution with this option. Items without assigned locations might exist anywhere, requiring additional time to locate them. Creating a separate count sheet exclusively for these items, distinct from the neatly organized sections by aisle, shelf, and bin, proves more efficient.
- Include items that are NOT seeded: This provides an effective method for establishing a quantity for previously unquantified items.
- Include Not-Valued Items: This ensures even seemingly insignificant items, such as common office supplies, are counted.
For companies with consignment items, choices exist to count only these items, exclude them from the count, or include them within the general count.
The system also allows designation of specific inventory classes for counting. A small box within this section, labeled "Classes", accommodates these classifications. Class A typically comprises fast-moving parts, Class B includes less frequently used parts, and Class C contains rarely used items, consequently requiring less frequent counts.
If inventory categories are present, this section allows assignment of one or more of those categories.
On the right side of the interface, users specify the location where the counts occur. Additionally, an option exists to count specific items, with a checkbox to include only these items on count sheets.
Users should not hesitate to create multiple cycles to accommodate various counting scenarios. After inputting all necessary information, save the record and proceed to generate the cycle count sheets.
Maintenance software that delivers real value
MAPCON helps maintenance teams stay ahead of work orders, support better decisions, and reduce downtime.
Step 2: Printing Count Sheets
 This step primarily involves printing the generated count sheets. The system provides numerous filters to retrieve the specific count sheets needed. Once printed, distribute them to the counting personnel. Alternatively, to conserve paper, conduct the count using a mobile application on a tablet or smartphone.
Step 3: Entering Count Quantities
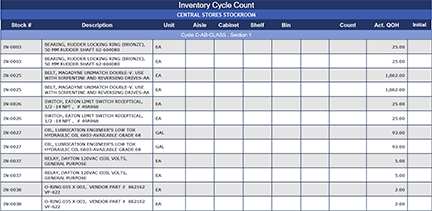
Upon receiving the completed count sheets, double-click the cycle in the Lookup tab to access the inventory information. At the top, the generated date and the last updated date for this cycle will display. The "Items to Count" section presents column headers for "Stock#" and "Description", followed by location breakdowns for each item, depending on the stockroom layout.
Attention to the next two windows is crucial. The final column displays the quantity the system currently recognizes. The blue data field, labeled "Quantity On Hand" (QOH), awaits the numbers from the completed count sheets. Before manually entering each number, compare the totals to the system's "Current QOH". If only minor differences exist, clicking the "Copy Qty On Hand" button automatically populates the QOH column. Subsequently, manually adjust any discrepancies noted on the count sheets. It is imperative to enter a numerical value; a blank field will not be accepted. If an item is absent, input a zero.
Step 4: Reconciling Counted Items
The Lookup tab again presents the list of cycles. Double-clicking a cycle reveals the Main tab, displaying the "Count Sheets" window. Before proceeding, ensure everything aligns as intended. If a discrepancy was noted during quantity entry (e.g., the system shows ten items, but the count sheet indicates three, yet ten are known to exist), this presents an opportunity for a personal verification. The discrepancy might stem from a miscount or overlooked items in another location.
Accelerate your maintenance results
Pick the next step that fits you best: start your free trial or see MAPCON live with our team.
Verifying and Finalizing the Count
Even after initial checks, conduct a double-check during this step. Execute a 'Pre-Reconciliation Report' and meticulously examine it for differing totals. When satisfied with the accuracy, allow the system to provide another layer of assistance. Activate the 'Stop For Discrepancy' checkbox as a safeguard against missed inconsistencies. Human fallibility means even the most careful individual can overlook a number or two.
Within the "Count Sheets" window, check the box for "Ready to Reconcile" and select "Reconcile Now" when prepared. The system will inquire if a pre-reconciliation report was run, then notify that reconciliation is about to commence, prompting a final confirmation of readiness. While repetitive warnings can sometimes induce impatience, consider the rationale behind these prompts. The totals confirmed during this step become the official numbers the system employs for tracking quantities. While inventory adjustments remain possible later, this process impacts a significant portion of inventory. These quantities influence future issues and returns, and if specific parameters are established, the system generates purchase requisitions based on these updated quantities. View these messages as the system ensuring control over inventory accuracy.
After the reconciliation process completes, the system offers to run a final reconciliation report detailing the actions taken. Print or export this report to another file type for record-keeping. Additional reports, including "Item Accuracy" and "Last Count Age", are accessible from the "Cycle Reconciliation Reports" menu.
Maintaining Inventory Integrity During a Count
The inventory management system provides control, so establishing a notification procedure when a physical count commences is advisable. Even though the process begins with generating count sheets, the system still allows for changes in inventory quantities.
For instance, if a count sheet shows five of a particular part, and minutes later one is removed, the system will then record four. While this discrepancy will resolve during reconciliation or after a second physical check, minimizing potential problems requires informing everyone when a count takes place. Post signs, erect barricades, or use any effective method to prevent interruptions during the count. Preventing unauthorized access to counting areas helps ensure the accuracy of the physical inventory.
Undertaking a physical inventory count demands time, yet it constitutes a vital component of effective inventory management and control. Neglecting this crucial task risks significant operational disruptions and inaccuracies within any stock-holding environment.
FAQs
Why are regular physical inventory counts essential despite using a CMMS?
Regular physical counts are essential because human error can still occur, such as misreporting an item's removal or incorrectly inputting a quantity, which causes discrepancies that jeopardize accurate stock availability for emergency repairs.
What is the purpose of establishing inventory cycles in a CMMS?
Establishing inventory cycles allows for systematic counting by defining which items to count, their location, and desired quantity, transforming a large task into manageable sections based on factors like time and item classification (e.g., fast-moving vs. rarely used).
How do filtering options aid in managing the physical count process?
Filtering options are critical for limiting the maximum number of items per count sheet section, allowing teams to divide the task efficiently, and enabling selection of items by specific criteria like location, value range, or inventory class.
What is the significance of the "Quantity On Hand" (QOH) field during quantity entry?
The QOH field requires the manual entry of the physical count number, and before entry, the system allows users to compare this against the current system quantity to easily identify and adjust only the existing discrepancies.
What safeguard does the CMMS from MAPCON offer during the reconciliation step?
The CMMS from MAPCON offers the 'Stop For Discrepancy' checkbox, which acts as a safeguard against missed inconsistencies, ensuring that differences between the physical count and the system's recorded totals are addressed before finalization.
Why is it crucial to prevent inventory changes during a physical count?
Preventing inventory changes during a count is crucial because even though the system tracks them, any changes made while counting personnel are working will create immediate discrepancies that must be manually resolved later, compromising initial accuracy.
MAPCON | 800-922-4336
Try Our CMMS Software Today!
MAPCON CMMS software empowers you to plan and execute PM tasks flawlessly, thanks to its wealth of features and customizable options. Want to see it for yourself? Click the button below to get your FREE 30-day trial of MAPCON!